THE
MAINSHEET
Autumn 2009
Contents
Trouble With Over Easy
Over Easy, ST369 that is, not yours truly became forty-
A306 was made by Ciba-
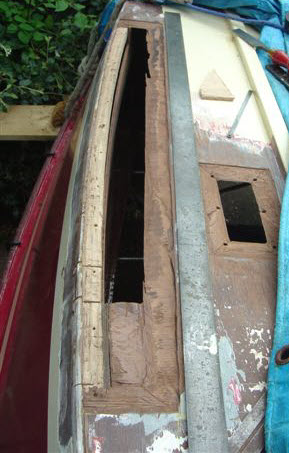
Over Easy was constructed using A306 and around about regatta time I began to notice rather large amounts of water appearing in the boat. At first I thought that a self bailer seal had gone, Oh! That it had been that easy. Further investigation revealed that the port side floor was dropping away from the port side tank walls. The A306 had finally let go. The joint in question is where the floor meets a curved pine section that runs the length of the boat and secures together the inner and outer side tank walls and the floor. The break seemed to run aft from the thwart support on the port side.
Nigel kindly hauled Over Easy to Epsom for me. I'd just replaced my car and it didn't have a tow bar fitted. I removed all the deck fittings and got it upside down on trestles in the drive and left it to dry out for a while.
Next Richard looked in and over several coffees we discussed the best repair strategy. Richard has ST368 which was built alongside ST369 in the Hawker SC boathouse at Ham, so I guess he had a vested interest in what had gone wrong. We concluded that water had been getting in for some time and the marine ply in the immediate area has begun to delaminate. For better or worse all this rotten timber would have to be cut out to get back to sound wood.
We cut out a 6" section of the floor from the chine inboard and about 30" long before we got to sound timber. This also entailed removing a section of the reinforcing strap that runs across the floor under the thwart. Later I removed a section of the inner tank wall which was also rotten. Luckily however the bottom pine beam and the outer tank wall were sound. I also removed the P & S self bailers.
The whole area was then cleaned up and 'pickled' with wood preserver and wood hardener. I next made up some cardboard patterns which I used to cut the new marine ply; but nothing’s straightforward and at this point I realised that the floor was 6mm ply and the tank walls 4mm ply. I only had 6mm. Richard solved the problem and routed down a section of the thicker material to 4mm, what a star! The fitting of the new wood was fairly trouble free although cutting 1" scarf joints is very time consuming and requires very sharp planes and chisels <Photos available> Any inconsistencies were taken up by copious amounts of epoxy resin thickened with colloidal silica.
West & SP epoxies are the modern day versions of A306 but they are toxic and require VERY careful handling. You can get sensitized to the stuff and the results are not very pleasant. Colloidal silica should not be used without a mask; its carcinogenic and you do not want to inhale any of it. I also took the opportunity to seal up the opening where the port bailer used to live and increase the starboard bailer opening to take a new slightly larger Evestrom bailer.
The next job, while the dinghy was upside down, was to strip the P & S chines back to bare wood and cover over with 50mm fibreglass tape. Hopefully strengthening the chines and the repaired section and ensuring an external waterproof seal around the boat.
Once cured all that remained was to clean down the bottom and sides, mask off, prime, undercoat and top coat. However nothings that easy and I spent several frustrating days dashing in and out between the showers before everything was finished including the installation of the new larger bailer in the starboard side floor.
Finally I was able to turn the dinghy over and start on the inside. The new inner tank wall and floor required some dressing and the section of the reinforcing strap that had been cut out had to be replaced together with a patch over the old port bailer aperture. The rest was straightforward and required applying a fillet to the inner tank wall floor joint, staining and varnishing the tank walls and painting the floor with non slip deck paint.
By now I'd just about had enough but the decking still had to be rubbed down and
re-
I have to say that the maintenance overhead, let alone the skills required to do something like the above is why nowadays nobody wants a wooden dinghy anymore. Having said that I've watched Bryan Clements repairing fibreglass Lasers at the club and that no easy task either. I guess any kind of boat will, eventually, require some kind of work … but please don't come to me; much as I love Over Easy I've had all the repair fun I need for one year.
Mike (Hopefully nice and dry) Baker